How to Remove Dreadlocks: the Knotty Boy Method
The following technique is salon-tested and can help to remove dreadlocks of any age from any hair type. How long removal will take depends on a number of factors: how tight the knots are, how many helpers you have, etc. To avoid reaching for the scissors in a fit of frustration, tackle only a small portion of your hair at a time, then come back to it later to pick free another small section. Like starting dreadlocks, patience will be your best friend in removing them, and your reward will be the head of lovely, loose hair you've spent so much time growing.
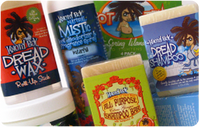
Knotty Boy Dreadlock Removal Shampoo breaks down any hair product residue, and natural / environmental build-up, loosening and preparing locks for removal.
Knotty Boy Dreadlock Removal Deep Conditioner coats hair strands, allowing the tightest of knots to be freed while protecting and restoring hair during and after removal.
NOTE: If your hair is permed, coloured, relaxed or otherwise chemically treated, it may be more prone to breakage in the process of removal. Use caution, go slow, be realistic in your expectations, and you'll be on your way to loose, free-flowing locks!
If your hair is not dreadlocked and you are looking to help remove trauma tangles or any type of non-intentional dreadlock, please click here for our statement on usage of our kit for this purpose, and all we know about removals of this kind.
Detailed Instructions

Step 1 - gather your gear
- The Knotty Boy Emergency Dreadlock Removal Kit
- a patient friend or two (three is probably enough but you do you)
- a metal-tipped tail comb *
- a spray bottle
- rubber gloves
- old towels
* avoid using a comb with a tapered pick, as this can damage hair which is held tightly in a dreadlock when picking out.

Step 2 - get prepped
Before washing and starting on all the little knots, tackle any big ones. If you have joined dreads or matted sections at the roots, gently pull them apart, as close to the scalp as possible.

Step 3 - wash your dreads
The first step in removal is washing out any wax or build-up you may have; it'll work against you in this process, holding your strands together. Wash the length of each dread with the Removal Shampoo in the hottest water you can stand, and really scrub it in. If you can soak your locks for a while in a tub or bucket of hot water before or while washing, even better.
Rinse out the suds, and massage the Removal Conditioner into each lock, saving some to use later. Don't rinse, just wrap it all up in a towel to keep it out of your face until you're ready to work.

Step 4 - pick apart the knots
Here some planning is in order. Are you doing this yourself, a few hours a night? Or are you making a party out of it? The reason this is important is that if you don't expect to finish in one session, best to conserve the Conditioner and use only a little bit at a time on the section you're working on, wetting each lock one at a time as you get to it.
If you have a small army of willing victims friends and foresee getting it all done in one go, then work it through all your locks at once, and wrap it all up in a towel, pulling out the ones which are being worked on.
Either way, try to save some Conditioner to mix with water in a spray bottle (at least two parts water to one part Conditioner) for extra conditioning during removal.
Grab your first dread. If you have a tail comb, use the metal tip to pierce the very bottom of your lock, and pull. If using a regular comb, do virtually the same thing with the teeth of the comb, starting at the very, very bottom of the lock. If the metal tip, or your comb, is stuck and goes nowhere, apply a little more pressure. If you still get nowhere, move further down toward the end again until you can free some hair. Gently pull the knots apart for an inch or so.
If you need more slip, try spraying a mixture of Removal Conditioner and warm water on the area you're working. Keeping the area wet will increase the elasticity of the hair and help prevent breakage while you pick.

Step 5 - gently comb
When you've got a portion loosened up, start combing through to the bottom to free the tangles and any shed hair. Continue until you meet up with the still-dreaded portion of your lock.
Repeat Steps 2 and 3 until you've finished the whole dread, then move on to the next one, then the next and the next, until your whole head is freeee!
Note: You're going to lose a lot of hair in this process, especially if you've had your dreads for some time. Don't panic! Most of it has been naturally shed and caught up in your lock until now. Don't stress about it, that's hair you lost a long time ago!

Step 6 - finishing rinse
Now that your strands are loose and flowing, give your scalp and hair another round with the Kit. A good sudsing will really get it deep-down clean, and an extra conditioning will help repair some of the stress of all that pulling.

Step 7 - the big reveal!
Your hair will be a bit crazy at first, but that's totally normal. It's been tightly bound up for a long time! Trimming a little off the ends is ok to get rid of any extra long bits, but wait a few days before you commit to a big style change; don't judge your hair's condition on Day 1 of removal! Use a leave-in conditioner (if you've got thicker hair, your Removal Conditioner/water spray bottle combo will work great) and the rest of your Removal Kit for continued repair, and within a few days you'll notice your hair acting like it did before dreads.
In the meantime, low-temp blow drying or flat ironing straight or wavy hair smooth, or oiling/deep conditioning kinky, coily and curly natural hair will tame frizz, add shine and showcase your beautiful, new lengths!
For ongoing aftercare, especially for hair types prone to regular tangles and matting, check out our popular, all natural Knotty Boy Ultimate Detangler. This jumbo pump-bottle of conditioner works wonders for the easy, daily removal of the MOST dreadful tangles and knots. It also offers light curl definition, all day wash-out or leave-in shine, softening, moisturizing and a delicious tropical scent.


TROUBLESHOOTING
I don't have dreads, but I do have a massive knot and I don't know what to do! Will this help?
Quite possibly! The same techniques will work with bad mats in otherwise loose hair. However, if you don't have a free end to work with, you'll want to start with dry hair so you can more easily see the physical knots and how they relate to the rest of your hair. Once you've got it loosened and located the free ends, you can begin the process as described.
I removed my dreads just fine, until I got to the roots. What gives?
Up near your roots you'll encounter some really tough build-up: natural sebum (scalp oils), from hair products or a little of both. That knot (up until when you decided to comb out) has been rubbing against your scalp getting tighter and tighter. Don't keep banging your head - and comb - against the wall trying to break through it; you've probably already untangled the knots, but build-up may be gumming up your strands. Once it's out in the open, another wash or two should get rid of it and you can do a final brush through.
I removed my dreads and my hair feels so ... small. I lost so much hair! Am I going to be bald?!
Hold up, Chicken Little. If you were careful, most of what you just combed out of your dreads was hair you lost a long time ago, totally naturally. You've basically been hoarding every single strand you've grown for as long as you've had locks. Loose hair is really light compared to the weight of dreads, and you'll have a fraction of the volume you're used to. It is going to feel weird for the first week or two after removal, but you'll get used to it again.
My hair was never fine/thick/curly/straight before! Did dreadlocks change my hair?
Keep in mind that depending on when you started your dreads and how long you've had them, your hair may have changed significantly. Factors like medication, hormones and age can all permanently change your hair's natural texture from what you're used to.
I HATE IT! Can I have my dreads back, please?!
Of course! There's no 'time limit' you have to wait before starting over, just give your hair a few washes to remove all that slippery Removal Conditioner. And if you got a friend to help you remove them... maybe ask a different one to help you resection and start 'em again? *bats eyelashes*
More answers here.