
Follow these easy instructions to maintain your roots, flip-free.
I highly recommend adding these steps to your weekly dread maintenance routine, once you've washed your locks (check the How to Wash Dreads tutorial for easy tips and info) and damp palm rolled with Knotty Boy Locksteady Tropical Tightening Gel, if you really want to speed up the root-tightening process. We realize there is a lot of info out there and a million different techniques for helping roots dread faster: this is our best advice based on years of creating and maintaining dreadlocks professionally!
By Kris, loctician for The Dreadquarters
Detailed Instructions

Step 1 - don't flip out
Root flipping, or interlocking, often gets presented in the same way as a crash diet or a get-rich-quick scheme - by promising fast results with little or no work on your part. When's the last time one of those worked for you?
Luckily, the alternative to maintaining your dreads at home is way easier, and safer, than root flipping. It doesn't yield such immediate results, but it works much better long-term, while keeping your locks strong and healthy.
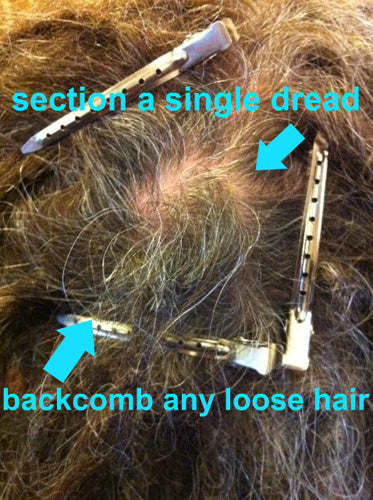
Step 2 - sectioning
Start out by isolating the dread you want to work on. Use clips if you've got a ton of loose hair - it'll make your life easier. Once you've identified the section's boundaries, grab the loose hair and the dreadlock. (If you have long loose hairs, it's a good idea to backcomb them up before you move on to the next step.)

Step 3 - get a grip
Get a good grip on the loose new growth and your dreadlock, making sure you don't have any hair crossing over from another dread.

Step 4 - root rubbing
Start rubbing the dread root into your scalp. Some advice says to rub in a clockwise or counter-clockwise motion, but that's kinda bunk - rub it every which direction! Go crazy! (Try not to hurt yourself, keeners.) Remember, what we're trying to create here is knots.

Step 5 - palm rolling
When you've got a good knot starting to form at the root, go ahead and give your dread a solid palm roll to the tip. If the dread is thoroughly dry inside and out, I like adding a light coating of Knotty Boy Dread Wax to my palms at this point to keep the lock looking tight and groomed, but that's up to you.
The best thing you can do for your dreadlocks overall is palm roll. Palm roll! PALM ROLL!
And there you have it! Root rubbing: our flip-free method for tighter, healthier dreadlock roots.